I passed the AWS Certified Solutions Architect – Associate exam on 12/11 and the AWS Certified Developer – Associate exam on 12/15. Woohoo!


I passed the AWS Certified Solutions Architect – Associate exam on 12/11 and the AWS Certified Developer – Associate exam on 12/15. Woohoo!
I had a good time at AWS re:Invent 2017 last week, despite being sick as a dog for most of it. Though I caught fewer sessions than I would have liked, the ones I did attend on serverless topics were top notch. Here are some links to my favorites:
ARC401 – Serverless Architectural Patterns and Best Practices
Highlights:
SRV401 – Become a Serverless Black Belt: Optimizing Your Serverless Applications
Highlights:
SRV305 – What’s New in Serverless
Highlights:
When using SNS pub/sub components, a common integration pattern is to use Lambda to process SNS messages. This can include the use of data blobs as the SNS payload for doing file processing, data transformations, and archiving data in S3 among other things. SNS messages have a large payload limit of 256KB per message, but I recently ran into a situation where I could not reliably deliver messages that were sized well under that limit.
As it turns out, when Lambda is consuming your SNS large payloads in events, you hit a limit within Lambda that is exactly half of the SNS payload limit. For Event (asynchronous) invocations in Lambda, there is a 128KB payload limit. So, if your SNS messages are not being processed by Lambda, check the size of the messages and verify that they are below 128KB. This was a confusing problem until I looked at the CloudWatch console for SNS message deliveries and noticed the errors there.
I’ve recently been working on a streaming component in a project and have been spending a lot of time with both Kinesis Streams and Kinesis Firehose. I tend to think of the two as event queue frameworks, with Firehose also having the ability to forward events to other AWS services like ElasticSearch (for Kibana-style dashboarding) and backup the same data to a S3 bucket. If you don’t need either of those destinations, then most likely you will get plenty of mileage out of working with Streams alone.
Potential uses abound, but one powerful pattern is making Kinesis a destination for CloudWatch Logs streams via subscription filters. By creating a Kinesis stream and making it a CloudWatch log destination in one account, you can readily add CloudWatch subscription filters in other accounts to create a cross-account log sink. Once your CloudWatch Logs are in one or more Kinesis Streams shards, you can process that log data via Lambda and/or possibly forward to Kinesis Firehose for ES/S3 delivery. There’s a great blog post over at Blend about this exact sort of usage, including a link to their GitHub repo for the CloudFormation templates they use to build and deploy the solution.
One of the best overviews I’ve read recently about design and scale-out issues around event queue processing and how Kinesis resolves, by design, a lot of the challenges therein (e.g., data duplication, ABA problems) is by the fine folks over at Instrumental, entitled “Amazon Kinesis: the best event queue you’re not using“. If you are considering using Kinesis at scale, or are already designing/deploying a consumer/producer pattern to be used with Kinesis, I highly recommend you check out the Instrumental blog post.

Python’s logging module provides a powerful framework for adding log statements to code vs. what might be done via using print() statements. It provides a system of logging levels similar to syslog-style levels that can be used to produce both on-screen runtime diagnostics as well as more detailed logs with full debug level insights into per module/submodule behavior.
Managing usage of logging() can be complicated, especially around the hierarchical nature of the log streams that it provides. I have developed a simple boto3 script that integrates logging to illustrate a basic usage that is easy to adopt and, in the end, not much more work than using print() statements. For detailed information on logging beyond what I present here, consult the excellent Python docs on the topic, as well as the links in the References section at the end of this post.
The setup for logging() that I am using involves two configuration files, logger_config.yaml and logger_config_debug.yaml. The difference between the two files has to do with the log levels used by the log handlers. By default, the example module deployVpc.py uses the logger_config setup. This config will produce no screen output by default except at the ERROR level and above. It produces a log file, however, that contains messages at the INFO level for the module and at the WARNING level for boto-specific calls.
Note: boto (including botocore) ships with some logging() active at the INFO level. While not as detailed as DEBUG, there’s enough busyness to that level of logging by boto that you will likely want to not see its messages except when troubleshooting or debugging your code. This is the approach I took with the current configuration, by opting to set custom logger definitions for boto and friends, so that the root logger will not by default display boto’s native log level messages.
Let’s take a look at the default logging configuration file I’ve put together, logger_config.yaml:
---
version: 1
disable_existing_loggers: False
formatters:
  simple:
    format: "%(asctime)s %(levelname)s %(module)s %(message)s"
  fancy:
    format: "%(asctime)s|%(levelname)s|%(module)s.%(funcName)s:%(lineno)-2s|%(message)s"
  debug:
    format: "%(asctime)s|%(levelname)s|%(pathname)s:%(funcName)s:%(lineno)-2s|%(message)s"

handlers:
  console:
    class: logging.StreamHandler
    level: DEBUG
    formatter: simple
    stream: ext://sys.stdout

  screen:
    class: logging.StreamHandler
    level: ERROR
    formatter: fancy
    stream: ext://sys.stdout

  logfile:
    class: logging.handlers.RotatingFileHandler
    level: DEBUG
    formatter: debug
    filename: "/tmp/deployVpc.log"
    maxBytes: 1000000
    backupCount: 10
    encoding: utf8

loggers:
  boto:
    level: WARNING
    handlers: [logfile, screen]
    propagate: no
  boto3:
    level: WARNING
    handlers: [logfile, screen]
    propagate: no
  botocore:
    level: WARNING
    handlers: [logfile, screen]
    propagate: no
  deployVpc:
    level: INFO
    handlers: [logfile, screen]
    propagate: no
  __main__:
    level: INFO
    handlers: [logfile, screen]
    propagate: no

root:
  level: NOTSET
  handlers: [console, logfile]
I chose to use YAML for the configuration file as it’s easier to parse, both visually and programmatically. By default, Python uses an INI file format for configuration, but both JSON and YAML are easily supported.
At the top of the file is some basic configuration information. Note the disable_existing_loggers setting. This allows us to avoid timing problems with module-level invocation of loggers. When logging per module/submodule, as those modules are imported early in your main script, they will not find the correct configuration information as it’s yet to be loaded. By setting disable_existing_loggers to False, we avoid that problem.
The remaining file consists of four sections:
Formatters are used to define the log message string format. Here, I am using three different formatters:
By default, I leave simple for the console handler (for root logger), use fancy for the screen handler, and debug for the logfile handler.
Handlers are used to define at what level, in what format, and exactly where a particular log message should be generated. I’ve left console in its default configuration, but added a StreamHandler and a RotatingFileHandler. Python’s logging module supports multiple types of handlers including Syslog, SMTP, HTTP, and others. Very flexible and powerful!
Loggers are referenced in your code whenever a message is generated. The configuration for a given logger is found in this section of the configuration file. In my case, I wanted a separate logger per module/function if necessary, so I’ve made entries at that level. I also include entries for boto and friends so I can adjust their default log levels so I don’t see their detailed information except when and where I want to (i.e., by logging at WARNING instead of INFO or DEBUG for normal operation). A logger entry also defines where log streams should end up. In this case, I send all streams to both my screen handler and my logfile handler.
I also don’t want custom loggers to propagate messages throughout the logging hierarchy (i.e., up to the root logger). So I’ve set propagate to “no”.
I created a module called loggerSetup.py which is where I do the initialization for defining how logging() will be configured, via the configuration files:
#!/usr/bin/env python
"""Setup logging module for use"""

import os
import logging
import logging.config
import yaml

home = os.path.expanduser('~')
logger_config = home + "/git-repos/rcrelia/aws-mojo/boto3/loggerExample/logger_config.yaml"
logger_debug_config = home + "/git-repos/rcrelia/aws-mojo/boto3/loggerExample/logger_config_debug.yaml"

def configure(default_path=logger_config, default_level=logging.DEBUG, env_key='LOG_CFG'):
    """Setup logging configuration"""
    path = default_path
    value = os.getenv(env_key, None)
    if value:
        path = value
    if os.path.exists(path):
        with open(path, 'rt') as f:
            config = yaml.safe_load(f.read())
        logging.config.dictConfig(config)
    else:
        logging.basicConfig(level=default_level)

def configure_debug(default_path=logger_debug_config, default_level=logging.DEBUG, env_key='LOG_CFG'):
    """Setup logging configuration for debugging"""
    path = default_path
    value = os.getenv(env_key, None)
    if value:
        path = value
    if os.path.exists(path):
        with open(path, 'rt') as f:
            config = yaml.safe_load(f.read())
        logging.config.dictConfig(config)
    else:
        logging.basicConfig(level=default_level)
This module defines two functions: configure() and configure_debug(). This provides another way of running a non-default logging configuration without using the LOG_CFG environment variable (i.e., on a per-module basis). When you setup logging in your module like so:
loggerSetup.configure()
logger = logging.getLogger(__name__)
You would simply edit the first line to use .configure_debug() instead of .configure().
Usage is straightforward, simply do the following in each module you wish to use logging(). Refer to the deployVpc.py script for the full syntax and usage around these bits of code.
Note: deployVpc.py requires use of AWS API key access that is stored in a config profile (I used one called ‘aws-mojo’, change to your own favorite profile). It will create a VPC and Internet Gateway in your AWS account. But it will also, by default, remove those objects as well. Caveat emptor…
import logging, logging.config, loggerSetup
loggerSetup.configure()
logger = logging.getLogger(__name__)
Note: By using __name__ instead of a custom logger name, you can easily re-use this setup code in any module.
logger.info('EC2 Session object created')
That’s all there is to it. Below are some screenshots that show the handler output (screen and logfile) for both the default and debug configurations. Hopefully this will encourage you to look at using Python’s logging() framework for your own projects.
The full source for all of the logging module configuration as well as sample boto script is available over on GitHub in my aws-mojo repository.
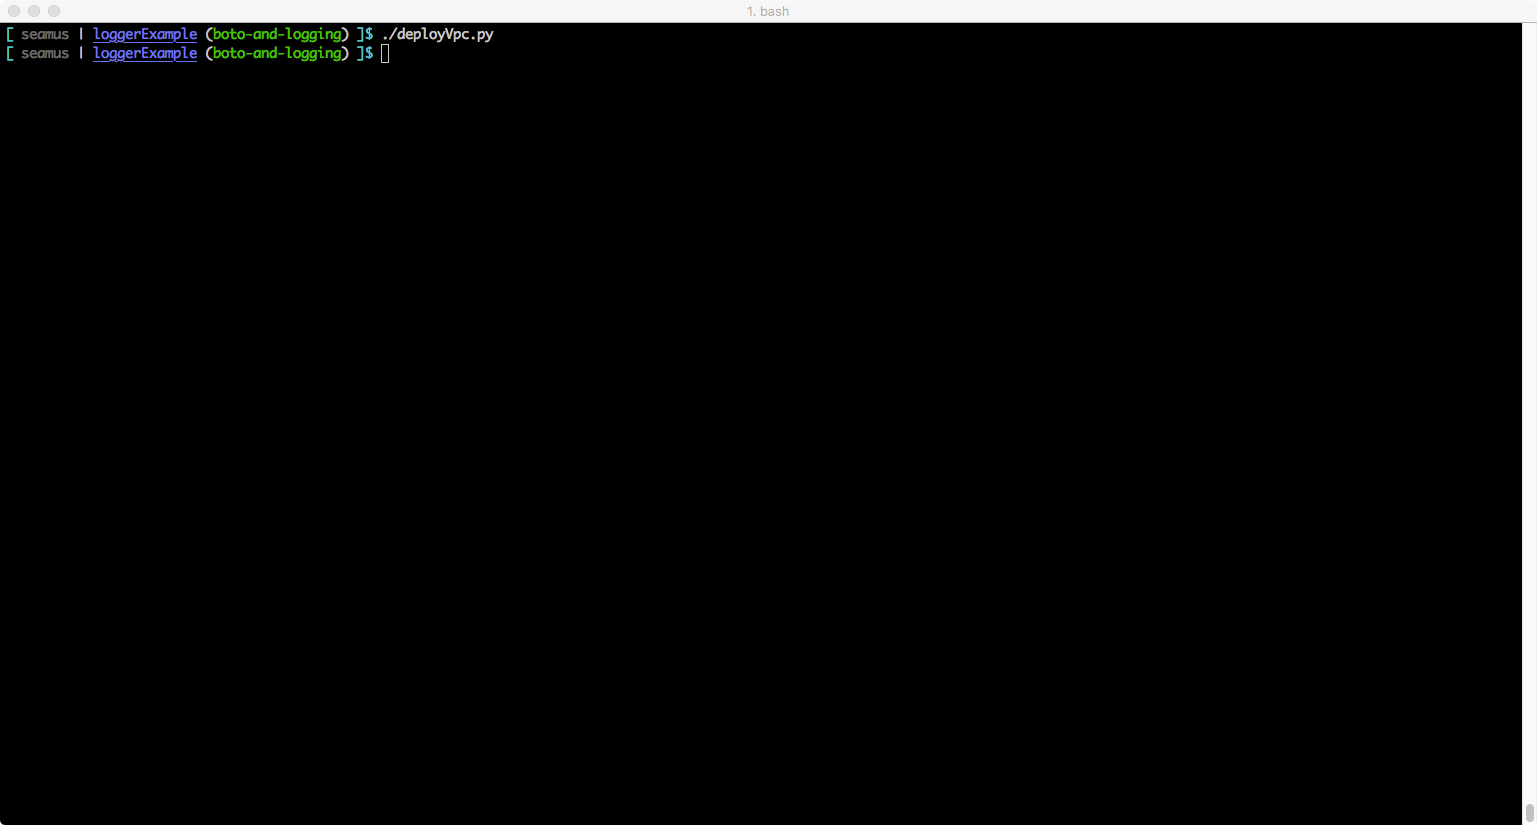
Example: Default configuration – output to screen handler (should be no output except ERROR and above)
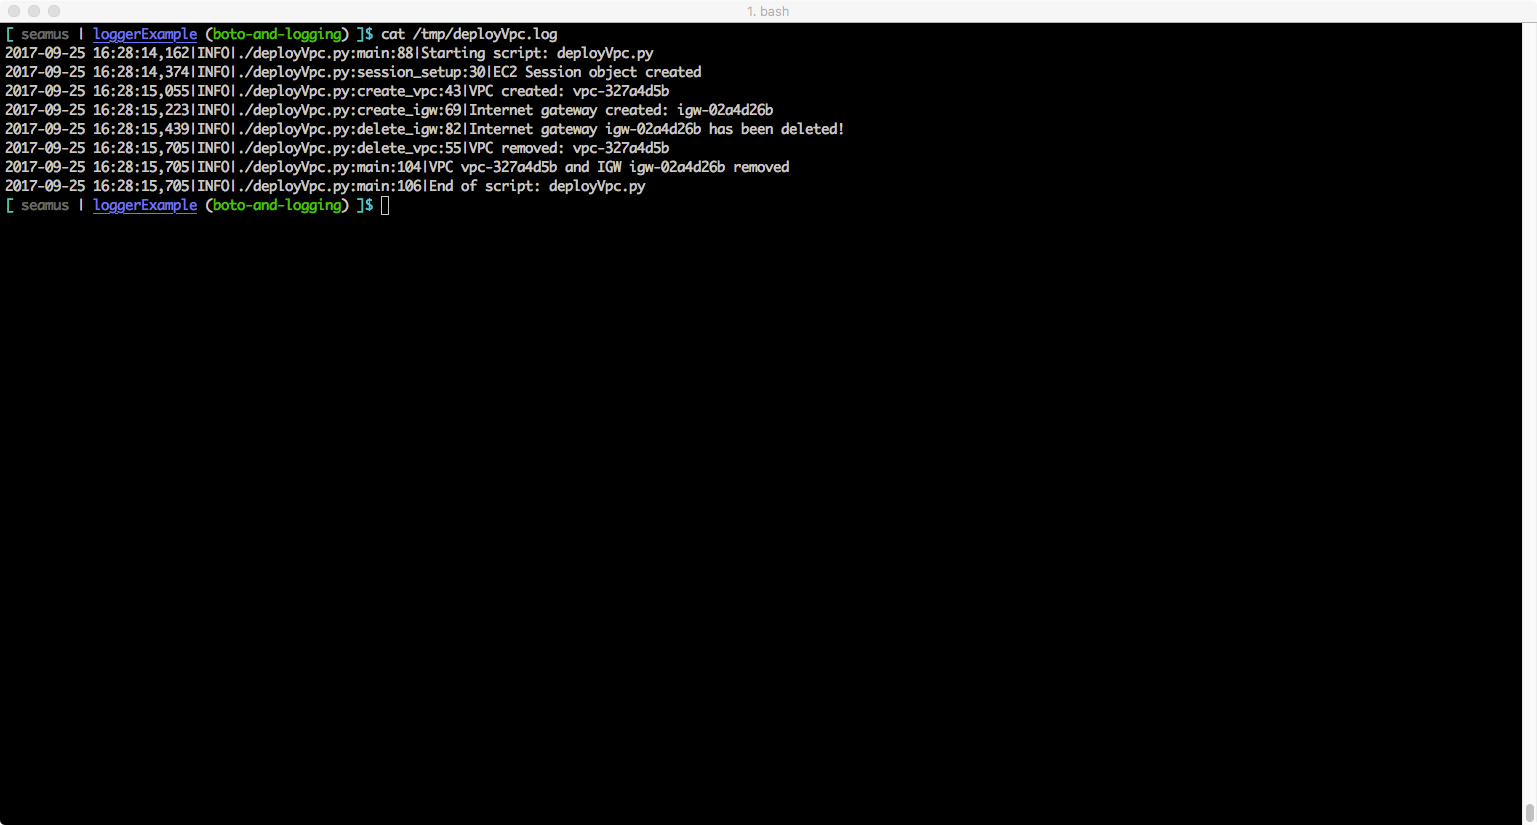
Example: Default configuration – output to logfile handler (should be messages at INFO and above for your code and at WARNING and above for boto library code messaging)
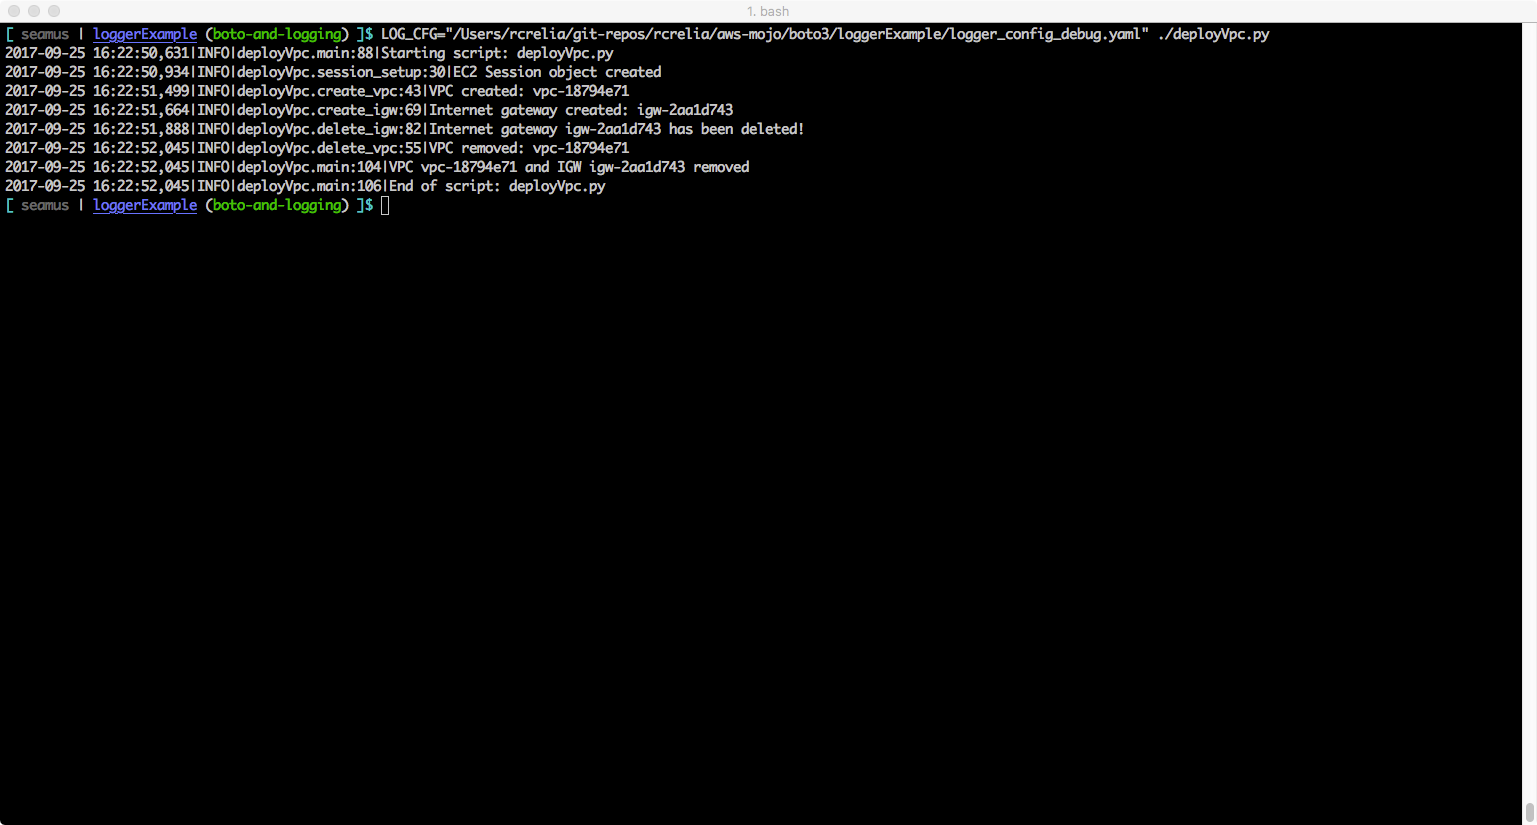
Example: Debug configuration – output to screen handler (should be messages at INFO and above for your code and at WARNING)
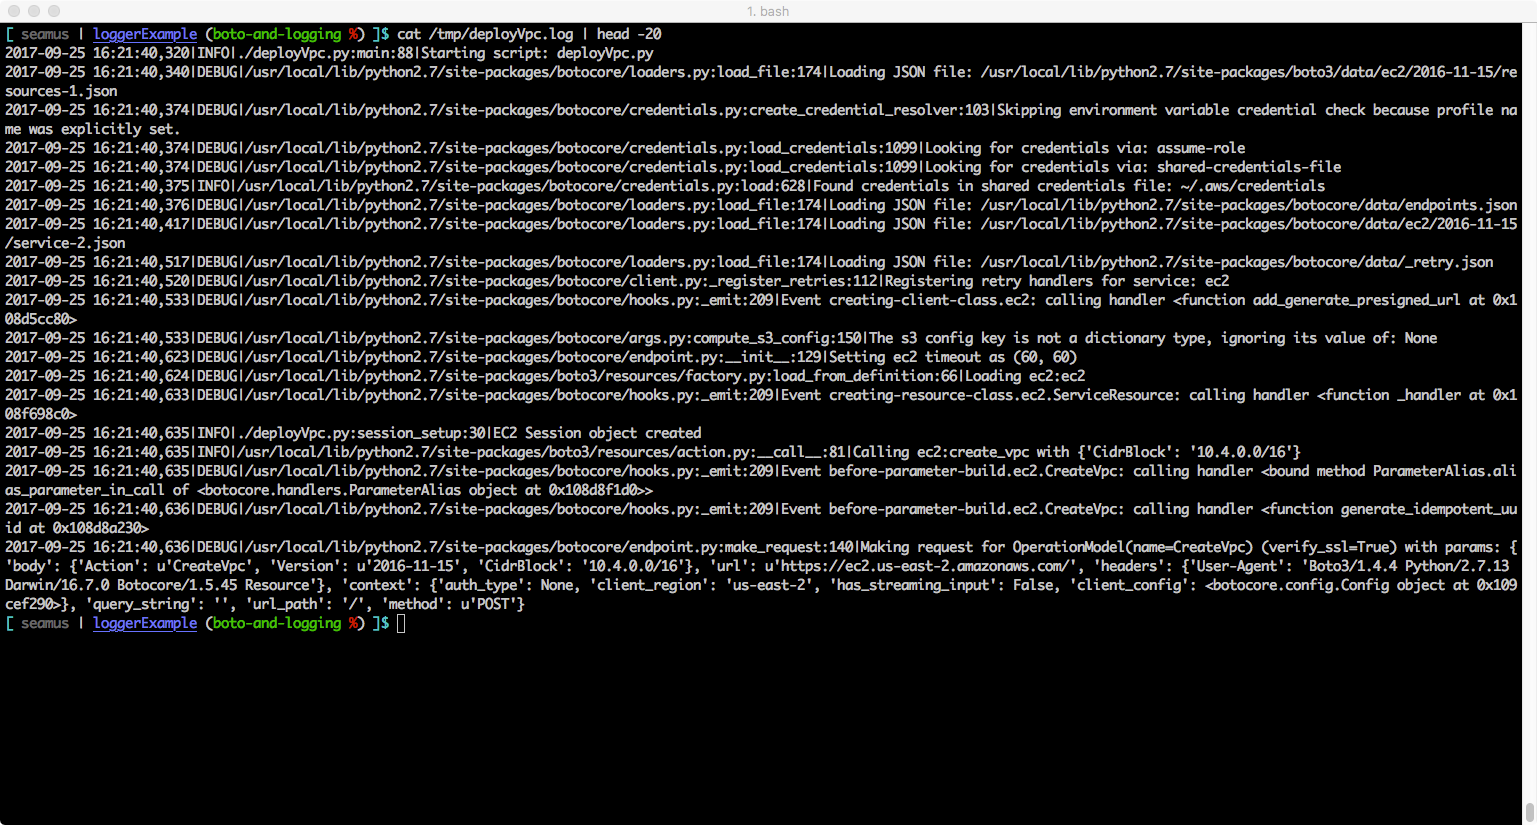
Example: Debug configuration – output to logfile handler (should be messages at DEBUG and all levels for your code and boto library code messaging)
When using Ansible to deploy and manage EC2 auto scaling groups (ASGs) in AWS, you may encounter, like I have recently, an issue with idempotency errors that can be somewhat befuddling. Basically, when the ec2_asg module is called, one of its properties, vpc_zone_identifier, is used to define the subnets used by the ASG. A typical ASG configuration is to use two subnets, each one in a different availability zone, for a robust HA configuration, like so:
- name: "create auto scaling group"
  local_action:
    module: ec2_asg
    name: "{{ asg_name }}"
    desired_capacity: "{{ desired_capacity }}"
    launch_config_name: "{{ launch_config }}"
    min_size: 2
    max_size: 3
    desired_capacity: 2
    region: "{{ region }}"
    vpc_zone_identifier: "{{ subnet_ids }}"
    state: present
Upon subsequent Ansible plays, when ec2_asg is called, but no changes are made, you can still experience a changed=true result because of how Ansible is ordering the subnet-id’s used in vpc_zone_identifier versus how AWS is ordering them. This makes the play non-idempotent. How does this happen?
It turns out that Ansible’s ec2_asg module sorts the subnet-ids, while AWS does not when it returns those values. Here is the relevant code from the v2.3.0.0 version of ec2_asg.py, notice the sorting that happens in an attempt to match what AWS provides as an order:
 518 for attr in ASG_ATTRIBUTES:
 519     if module.params.get(attr, None) is not None:
 520         module_attr = module.params.get(attr)
 521         if attr == 'vpc_zone_identifier':
 522             module_attr = ','.join(module_attr)
 523         group_attr = getattr(as_group, attr)
 524         # we do this because AWS and the module may return the same list
 525         # sorted differently
 526         if attr != 'termination_policies':
 527             try:
 528                 module_attr.sort()
 529             except:
 530                 pass
 531             try:
 532                 group_attr.sort()
 533             except:
 534                 pass
 535         if group_attr != module_attr:
 536             changed = True
 537             setattr(as_group, attr, module_attr)
 538
While this is all well and good, AWS does not follow any specific ordering algorithm when it returns values for subnet-ids in the ASG context. So, when AWS returns its subnet-id list for the ec2_asg call, Ansible will sometimes have a different order in its ec2_asg configuration and then incorrectly interpret the difference between the two lists as a change and mark it thusly. If you are counting on your Ansible plays to be perfectly idempotent, this is problematic. There is now an open GitHub issue about this specific problem.
The good news is that the latest development version of ec2_asg, which is also written using boto3, does not exhibit this false-positive idempotency error issue. The devel version of ec2_asg (i.e., unreleased 2.4.0.0) is altogether different than what ships in current stable releases. So, these false-positive idempotency errors can occur in releases up to and including version 2.3.1.0 (I have found it in 2.2.1.0, 2.3.0.0, and 2.3.1.0). Sometime soon, we should have a version of ec2_asg that behaves idempotently. But what to do until then?
One approach is to write a custom library in Python that you use instead of ec2_asg. While feasible, it would involve a lot of time spent verifying integration with both AWS and existing Ansible AWS modules.
Another approach, and one I took recently, is to simply ask AWS what it has for the order of subnet-ids to be in vpc_zone_identifier and then plug that ordering into what I pass to ec2_asg during each run.
Prior to running ec2_asg, I use the command module to run the AWSCLI autoscaling utility and query for the contents of VPCZoneIdentifier. Then I take those results and use them as the ordered list that I pass into ec2_asg afterward:
- name: "check for ASG subnet order due to idempotency failures with ec2_asg"
  command: 'aws autoscaling describe-auto-scaling-groups --region "{{ region }}" --auto-scaling-group-names "{{ asg_name }}" '
  register: describe_asg
  changed_when: false

- name: "parse the json input from aws describe-auto-scaling-groups"
  set_fact: asg="{{ describe_asg.stdout | from_json }}"

- name: "get vpc_zone_identifier and parse for subnet-id ordering"
  set_fact: asg_subnets="{{ asg.AutoScalingGroups[0].VPCZoneIdentifier.split(',') }}"
  when: asg.AutoScalingGroups

- name: "update subnet_ids on subsequent runs"
  set_fact: my_subnet_ids="{{ asg_subnets }}"
  when: asg.AutoScalingGroups

# now use the AWS-sorted list, my_subnet_ids, as the content of vpc_zone_identifier

- name: "create auto scaling group"
  local_action:
    module: ec2_asg
    name: "{{ asg_name }}"
    desired_capacity: "{{ desired_capacity }}"
    launch_config_name: "{{ launch_config }}"
    min_size: 2
    max_size: 3
    desired_capacity: 2
    region: "{{ region }}"
    vpc_zone_identifier: "{{ my_subnet_ids }}"
    state: present
On each run, the following happens:
I did a test on the idempotency of the play by running Ansible one hundred times after the ASG was created; at no point did I receive a false-positive change. Prior to this workaround, it would happen every run if I happened to be specifying subnet-ids ordered differently than from what AWS returned in terms of their order.
While this is admittedly somewhat kludgy, at least I can be confident that my plays involving AWS EC2 autoscaling groups will actually behave idempotently when they should. In the meantime, while we wait for the next update to Ansible’s ec2_asg module, this workaround can be used successfully to avoid false positive idempotency errors.
Until next time, have fun getting your Ansible on!
For some use cases, it’s not feasible to rely on an EC2 instance having any boto or AWS configuration information available (e.g., you are using an instance profile/role instead of API keys). This is a problem when it comes to establishing client sessions with services and you need to set the default region as an attribute to the boto3.setup_default_session() module.
Here’s one way to solve this problem via pulling the availability-zone element out of EC2 instance metadata, and then filtering that to drop the AZ portion (e.g., us-east-1b -> us-east-1).
First, import the urllib2 module into your code (Python 2.x):
import urllib2
Then, create a function like so that returns the AWS region name to the calling program:
def get_aws_region():

    # still no equivalent of boto.utils in boto3, so I have to do this janky thing...
    myAz = urllib2.urlopen('http://169.254.169.254/latest/meta-data/placement/availability-zone').read()
    myRegion = myAz[:-1]
    return myRegion
I have been meaning to put together a Lambda function to create an AMI from a custom EC2 instance. It’s a pretty typical scenario, but I haven’t taken the time to roll my own. Recently, I ran across an article on StackOverflow which provides a CloudFormation template that:
The Lambda function is written in the JavaScript SDK (node.js), is short and sweet, and easy to modify.
So, I modified both the template and Lambda function to make it a little more generic and reusable. Also, I fixed a logic error in a the original Lambda. Finally, I wanted to customize the name of both the image and AMI, so I created an InstanceName parameter. The only other parameter for the CF template is InstanceType, which I defaulted to t2.micro. Add your desired instance types to the list in that parameter’s AllowedValues attribute. The base AMI for the instance is a region-specific Amazon Linux image. Once the stack is deployed, simply update the template with your userdata changes to create new custom AMI’s. It’s a very helpful tool to have in your CloudFormation toolbox.
The template is available from my aws-mojo repo on GitHub in both JSON and YAML formats.
Enjoy!
In a previous post, I talked about how CloudFormation now supports YAML for templates. The fine folks at AWS Labs have since released a Python package, cfn-flip, that you can install and use from a shell to convert a CF template from one format to the other: if you feed it JSON, it converts to YAML, and vice-versa. It also works when used as a Python library.
Installing and using cfn-flip is this easy:
[rcrelia@seamus ~]$ pip install cfn-flip
Collecting cfn-flip
 Downloading cfn_flip-0.2.1.tar.gz
Requirement already satisfied: PyYAML in /usr/local/lib/python2.7/site-packages (from cfn-flip)
Requirement already satisfied: six in /usr/local/lib/python2.7/site-packages (from cfn-flip)
Building wheels for collected packages: cfn-flip
 Running setup.py bdist_wheel for cfn-flip ... done
 Stored in directory: /Users/rcrelia/Library/Caches/pip/wheels/1b/dd/d0/184e11860f8712a4a574980e129bd7cce2e6720b1c4386d633
Successfully built cfn-flip
Installing collected packages: cfn-flip
Successfully installed cfn-flip-0.2.1

[rcrelia@seamus ~]$ cat /tmp/foo.json | cfn-flip > /tmp/foo.yaml
I recently read through Chris Craig’s AWS Security Blog post about limiting S3 bucket access based on specific IAM credentials/roles. There are two parts especially worth mentioning that can be an effective solution for many needs (e.g., distributing secret key values programmatically).
First, you construct a specific S3 bucket policy that can be used for controlling access via IAM user id’s (IAM user, IAM instance role & instance profile) as well as the AWS root account. In the policy below, note the explicit Deny statement at the end, which is how you lock down access except for those IAM entities. Make sure you include yourself or root (and you have root access) otherwise you will lock yourself out of the bucket you just created. Best to work with a temp IAM user for testing, fyi.
{
 "Version": "2012-10-17",
 "Statement": [
   {
     "Effect": "Allow",
     "Principal": {
       "AWS": "arn:aws:iam::012345678901:role/my-role"
     },
     "Action": "s3:ListBucket",
     "Resource": "arn:aws:s3:::my-bucket"
   },
   {
     "Effect": "Allow",
     "Principal": {
       "AWS": "arn:aws:iam::012345678901:role/my-role"
      },
     "Action": "s3:GetObject",
     "Resource": "arn:aws:s3:::my-bucket/*"
   },
 {
     "Effect": "Deny",
     "Principal": "*",
     "Action": "s3:*",
     "Resource": [
        "arn:aws:s3:::my-bucket",
        "arn:aws:s3:::my-bucket/*"
      ],
     "Condition": {
        "StringNotLike": {
           "aws:userId": [
              "AIDAIDEADBEEF01234567",
              "AROAJABCD1234EF560123:*",
              "AIPAIBEA2510CD3498765:*",
              "012345678901"
            ]
         }
      }
    }
  ]
}
Note: IAM objects in the Deny statement condition have tell-tale userId patterns as follows:
This policy essentially prohibits all access to “my-bucket” and associated keys, except for those IAM objects listed in the Conditional to the Deny * statement.
To make sure that the IAM entities you are not Denying access to the S3 bucket in question, you must craft a specific IAM policy. Then attach the policy to the IAM object(s) that require access. This policy is straightforward and is the second piece of this solution:
{
 "Version": "2012-10-17",
 "Statement": [
    {
      "Effect": "Allow",
      "Action": [
         "s3:ListAllMyBuckets",
         "s3:GetBucketLocation"
       ],
      "Resource": "*"
    },
    {
      "Effect": "Allow",
      "Action": "s3:ListBucket",
      "Resource": "arn:aws:s3:::my-bucket"
    },
    {
      "Effect": "Allow",
      "Action": "s3:GetObject",
      "Resource": "arn:aws:s3:::my-bucket/*"
    }
  ]
}
These two policies together form a powerful mechanism for creating a simple distribution point for secrets that you wish to use but not store locally in code or on an instance. A potential variation might include integration with KMS to provide at-rest encryption as well as programmatic decryption/encryption of your secrets as you move them in and out of S3.