A very popular VPC configuration is the multi-AZ public/private layout that AWS describes as “Scenario 2”:
“The configuration for this scenario includes a virtual private cloud (VPC) with a public subnet and a private subnet. We recommend this scenario if you want to run a public-facing web application, while maintaining back-end servers that aren’t publicly accessible.”
Historically, AWS has provided a NAT instance AMI to use for Scenario 2 VPC’s, along with a HA-heartbeat configuration script that runs on each NAT instance. They’ve even published a CloudFormation template to build out a VPC according to this design. Recently however, with the advent of the NAT Gateway service, AWS now promotes that solution as preferable to NAT instance configurations for Scenario 2 deployments.
So Why Make a New Scenario 2 CloudFormation Template?
Given that AWS has published a CF template for Scenario 2 deployments, you may wonder why I chose to create my own set of templates. Let’s talk about why…
First, I realized that I wanted to be able to deploy a Scenario 2 VPC with *either* a NAT instance configuration or a NAT Gateway configuration. This new template reference allows me to do that. It also allowed me to discover why I might not want to use NAT Gateways, but I’ll get to that a little later.
Secondly, the published Scenario 2 VPC template does not include any perimeter security configuration a la network ACLs. Given that there are publically accessible subnets in a Scenario 2 deployment, I wanted to have the extra layer of security that network ACLs can provide.
Note: The default VPC configuration in your AWS account includes network ACLs that are wide-open, and when you create a new custom VPC like a Scenario 2 deployment, you must configure network ACLs from scratch.
Lastly, I wanted to integrate a VPC endpoint for S3 access to give that design a whirl. VPC endpoints are very useful in that they allow public service access inside a VPC directly without crossing an Internet gateway. They also isolate a substantial stream of network traffic from affecting either your NAT or Internet gateway flows. There are some caveats to using a S3 VPC endpoint, more on those later in this post.
A New Template-based Reference Configuration for Scenario 2 VPC Deployments
I’ve added my new Scenario 2 VPC reference configuration templates to my aws-mojo repository on GitHub. Feel free to pull those up in another window while we review them in more detail.
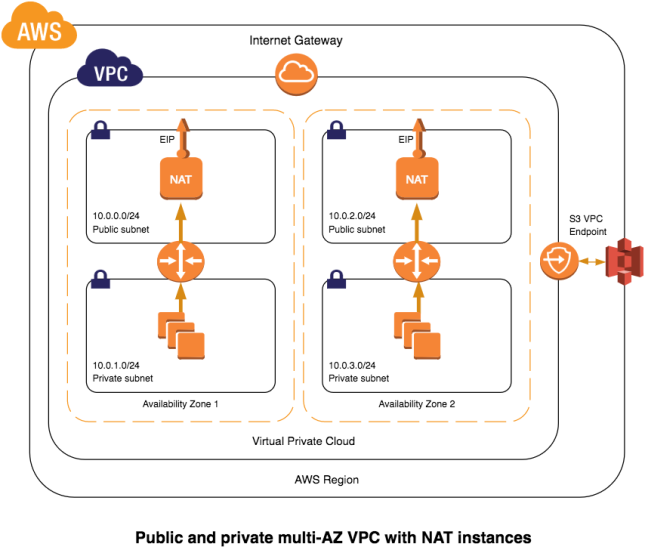
I initially started by creating a typical Scenario 2 VPC template with NAT instances. This template provides:
- a VPC with four subnets (2 public, 2 private) in two availability zones
- Network ACLs for both public and private subnets
- one NAT instance for each availability zone, each with its own Elastic IP (EIP)
- a NAT instance IAM role/policy configuration (with slight modification)
- cargo-cult porting of AWS’s nat_monitor.sh HA-heartbeat scripts (with slight modification) for the NAT instances (parameter defaults from AWS)
- a RDS subnet group in the private zones
The one change to the nat_monitor.sh script I made was to add some code to associate the newly created EIP with the NAT instances during instance first-boot. I found that this decreases the wait time required for the NAT instances to become operational via their EIP’s. Otherwise, there is some additional delay time for the automatic association of the EIP’s to the instances that normally occurs.
Here’s the relevant bit of code that I added to the UserData section of the NAT instance resource definition:
"UserData": {
  "Fn::Base64": {
    "Fn::Join": [
       "",
       [
         "#!/bin/bash -v\n",
         "yum update -y aws*\n",
         ". /etc/profile.d/aws-apitools-common.sh\n",
         "# Associate EIP to ENI on instance launch\n",
         "INSTANCE_ID=`curl http://169.254.169.254/latest/meta-data/instance-id`\n",
         "EIPALLOC_ID=$(aws ec2 describe-addresses --region ",
         {
           "Ref": "AWS::Region"
         },
         " --filters Name=instance-id,Values=${INSTANCE_ID} --output text | cut -f2)\n",
         "aws ec2 associate-address --region ",
         {
           "Ref": "AWS::Region"
         },
         " --instance-id $INSTANCE_ID --allocation-id $EIPALLOC_ID\n",
Note: For this to work, I also had to modify the IAM policy for the NAT instance role to include the actions ec2:DescribeAddresses and ec2:AssociateAddress.
With the addition of the Network ACL configuration, I eventually surpassed the template body size limit for validating CloudFormation templates via the AWSCLI. I also knew that I wanted to create a couple of sample EC2 security groups for private and public instances, in addition to the S3 VPC endpoint. So, at this point, I opted to created a nested NAT instance template, which contains resource definitions for three additional CloudFormation child stacks:
- aws-vpc-network-acls [ json | yaml ]
- aws-vpc-instance-securitygroups [ json | yaml ]
- aws-vpc-s3endpoint [ json | yaml ]
I followed general recommendations from AWS for the network ACLs and instance security groups. I also modified the configurations to suit my own needs as well, so you should review them and decide if they are secure enough for your own deployments.
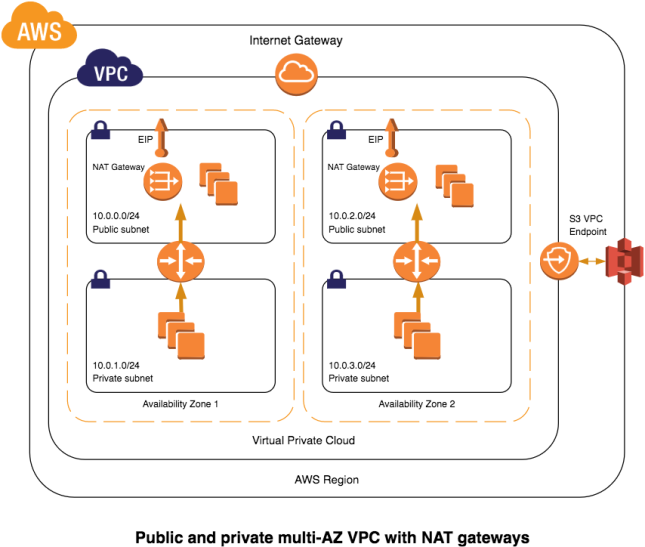
For a NAT Gateway version of this Scenario 2 deployment, just use the aws-vpc-nat-gateway template (json|yml) instead of the aws-vpc-nat-instances template (json|yml). It also is a nested template and references the three child templates listed above.
Here are diagrams showing the high-level architecture of each reference stack:
So How Do I Use This New VPC Mojo?
Download the templates from my aws-mojo repo and using the CloudFormation console, load the parent template of your choice (NAT instance or NAT Gateway). You should store the templates in the S3 bucket location of your choice prior to launching in the console (Duh!). However, you should make note of the S3Bucket and TemplateURL parameters in the parent template as you will need to input those values during the template launch.
Other parameters that will require either your input or consideration:
- Environment – used for tag and object naming
- ConfigS3Endpoint – defaults to no, see caveats below
- NatKeyPair – an existing EC2 keypair used to create NAT instances
- NatInstanceType – defaults to t2.micro which is fine for PoC deployment, not production
- RemoteCIDR – the network block from which you are accessing your AWS account
Note: The NAT Gateway version of the template does not require either NatKeyPair or NatInstanceType parameters.
The NAT instances template will render a useable VPC in about 15 minutes when I deploy into the busy us-east-1 region; the NAT gateway template renders in about 5-10 minutes. YMMV.
After reviewing the VPC endpoint caveat below, you can try using the S3 endpoint configuration by simply updating the parent CF stack and selecting “yes” for the S3Endpoint parameter.
Deploy instances into the public and private subnets using the security groups provided to test out your VPC networking and operational limits.
Caveats and Alligators
Caveat #1 – Don’t Use This As-Is For Production
I’ve designed this reference configuration for free-tier exploration of VPC buildouts. The NAT instance template defaults to using t2.micro instances, which is clearly insufficient for any real-world production usage. Feel free to use this configuration as a foundation for building your own real-world template-based deployments.
Caveat #2 – With my mind on my money and my money on my mind
I discovered the hard way about using NAT Gateways for my lab work. NAT Gateways are billed on an hourly basis along with usage fees. After deploying a VPC with NAT Gateways instead of NAT instances and letting it hang out for a while, I noticed my monthly bill jumped by quite a bit. Keep this in mind. In addition, you will need to maintain at least one bastion instance in one of the public subnets so you can get to your private zone instances. All things said, NAT Gateways are much preferred for production deployment vs. instances as they are simpler to manage and avoid the whole heartbeat/failover false-positive and/or split-brain problem associated with NAT instance configurations. However, for PoC work, you will accrue costs quickly with a NAT Gateway solution. I like to use NAT instances and then turn them off when I’m not actively working on a project.
Caveat #3 – S3 VPC Endpoint Gotchas
Offloading S3 traffic from your NATs and Internet gateways is a good thing. However, there are known issues with using VPC Endpoints. The endpoint policy I use in this reference stack deals with the issue of allowing access to AWS repos for AMZN Linux package and repo content, but there are other issues that you will need to address should you go down the path of using S3 Endpoints.
